
Part 1: Introduction to Butterfinger Caramel Crunch Mini Pies
If you’re a fan of decadent desserts that combine rich chocolate, creamy caramel, and a satisfying crunch, you’re in for a treat. Introducing Butterfinger Caramel Crunch Mini Pies—a bite-sized delight packed with the signature taste of Butterfinger candy bars, luscious caramel, and a crispy graham cracker crust. These mini pies are perfect for anyone who loves indulgent sweets with a twist, offering the right balance of flavors and textures in each bite.
In this article, we’ll walk you through how to make these mouthwatering mini pies, share some helpful tips, and offer suggestions to take your pie game to the next level. Whether you’re planning for a family gathering, a holiday treat, or just a sweet indulgence, these mini pies are sure to impress.
Now, let’s dive into the details of these irresistible desserts, from ingredients to preparation. You’re going to love how easy and fun it is to create these Butterfinger Caramel Crunch Mini Pies!
 Part 2: Ingredients for Butterfinger Caramel Crunch Mini Pies
Before we dive into the step-by-step instructions, let’s first gather all the ingredients you’ll need to create these delicious Butterfinger Caramel Crunch Mini Pies. Don’t worry, most of the ingredients are simple and easy to find at your local grocery store. Here’s everything you’ll need:
Ingredients:
- 1 package of mini graham cracker pie crusts (about 6–8 mini crusts)
- 1 cup of Butterfinger candy bars, chopped into small pieces
- 1/2 cup of caramel sauce (store-bought or homemade)
- 1 cup of whipped cream (for topping)
- 1/4 cup of chocolate chips (for drizzling)
- 2 tbsp of powdered sugar (optional, to sweeten whipped cream)
- 1/4 tsp of vanilla extract (optional, for extra flavor)
- 1 tbsp of butter (for greasing the pan if necessary)
These ingredients combine to create the perfect blend of sweet, crunchy, and creamy flavors. The mini graham cracker crusts provide a crunchy base, while the Butterfinger bits add that signature crunch you can’t resist. The caramel sauce drizzled on top is a game-changer, and the whipped cream topping ensures that each bite is velvety smooth.
Now that you have everything you need, let’s move on to the next section: preparing and assembling these tempting mini pies!
Part 3: Preparing the Butterfinger Caramel Crunch Mini Pies
Now that we’ve gathered all the ingredients, it’s time to start preparing these decadent Butterfinger Caramel Crunch Mini Pies. This section will walk you through the steps to create the perfect base and filling, ensuring that each mini pie is packed with flavor and texture.
1. Prepare the Mini Pie Crusts
Start by ensuring that your mini graham cracker crusts are ready to go. If you’re using store-bought crusts, there’s no need to bake them – they’re good to go straight from the package. However, if you want to make the crust a bit more flavorful, feel free to toast them lightly in the oven for about 5 minutes at 350°F (175°C). This step adds a bit of extra crunch and enhances the flavor of the graham cracker.
2. Chop the Butterfinger Bars
Next, chop your Butterfinger candy bars into small pieces. You can do this by placing the bars in a Ziploc bag and using a rolling pin or mallet to break them into bite-sized chunks. This method ensures they’re perfectly crunchy without being too messy. You’ll want to have roughly 1 cup of chopped Butterfinger pieces.
3. Create the Caramel Sauce Layer
For the caramel sauce, if you’re using store-bought, simply heat it in the microwave for about 15–20 seconds to make it pourable. If you’re making your own caramel sauce, melt 1/4 cup of sugar in a saucepan over medium heat, stirring constantly until it turns golden brown. Add 1/4 cup of heavy cream, stir until smooth, and let it cool slightly before drizzling.
4. Fill the Crusts with the Caramel and Butterfinger Mixture
Once you have everything ready, it’s time to assemble. First, drizzle a little bit of caramel sauce at the bottom of each mini graham cracker crust. Then, fill the crust with chopped Butterfinger pieces, distributing them evenly. This will form a nice crunchy base and help the caramel and candy stick together once chilled.
5. Whipped Cream Topping
In a mixing bowl, whisk together the whipped cream, powdered sugar, and vanilla extract. If you want the whipped cream to hold up a little better, you can fold in a teaspoon of cornstarch, but this is optional. The whipped cream will create a smooth and airy contrast to the crunchy filling. Spoon a generous amount of whipped cream over each mini pie, ensuring it covers the entire surface.
Once you’ve added the whipped cream, you’re almost done! Let’s move on to the next step: finishing these mini pies with a decadent chocolate drizzle.
Part 4: Finishing Touches – Drizzle and Chill
Now that the mini pies are assembled, it’s time to add the finishing touches that will take them from delicious to truly spectacular. The chocolate drizzle and a little bit of extra caramel goodness will make each bite even more irresistible.
1. Prepare the Chocolate Drizzle
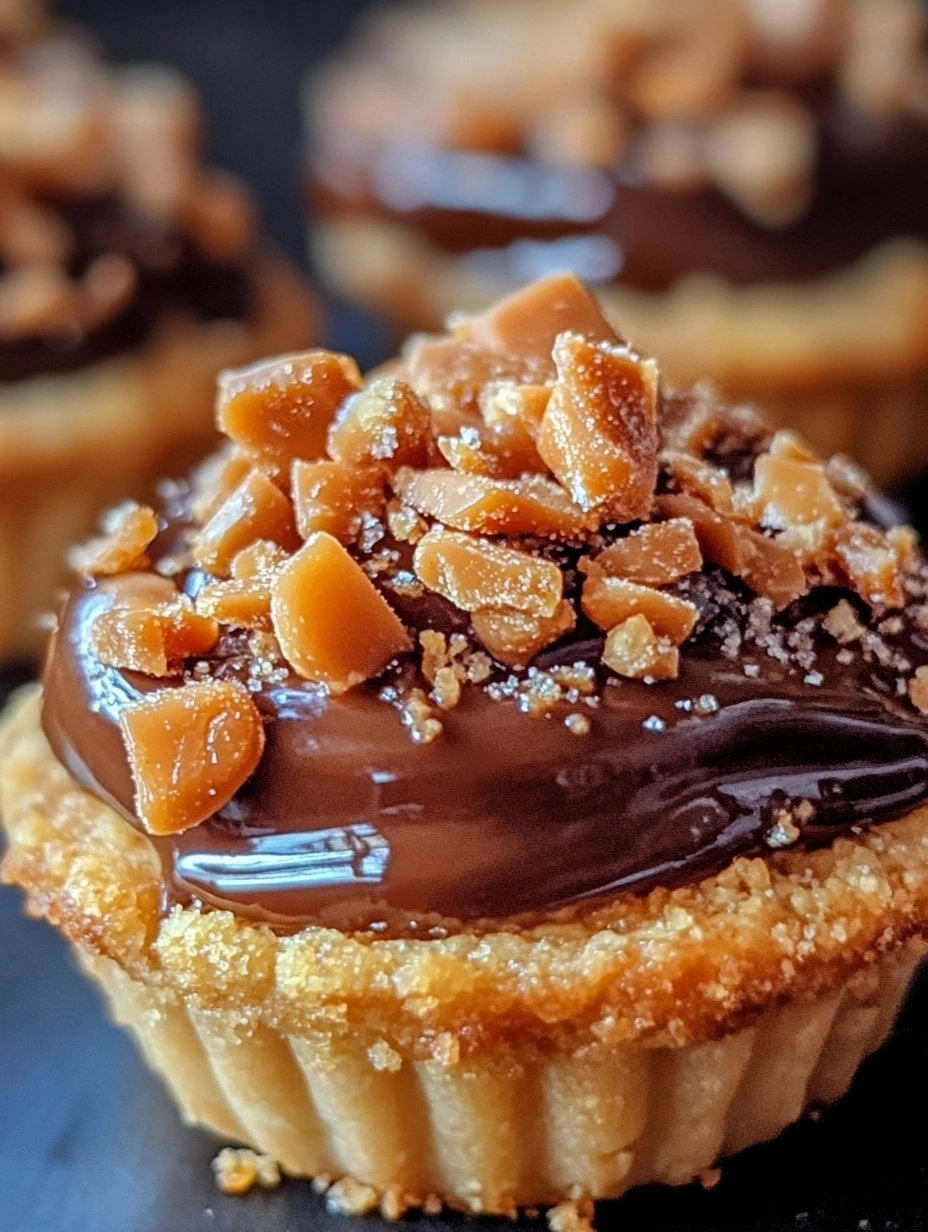
To create the chocolate drizzle, melt about 1/4 cup of semi-sweet chocolate chips. You can do this in the microwave in 20-second intervals, stirring in between to prevent burning. Once the chocolate is smooth and melted, transfer it to a small piping bag or a Ziploc bag with the tip cut off. Drizzle the chocolate over the top of each mini pie in a zig-zag pattern for a beautiful finish.
2. Add Extra Caramel Drizzle
For an extra dose of sweetness, drizzle some more caramel sauce over the top of the pies, following the same zig-zag method. This adds a lovely visual contrast against the chocolate drizzle and gives an extra layer of flavor.
3. Garnish with More Butterfinger Pieces
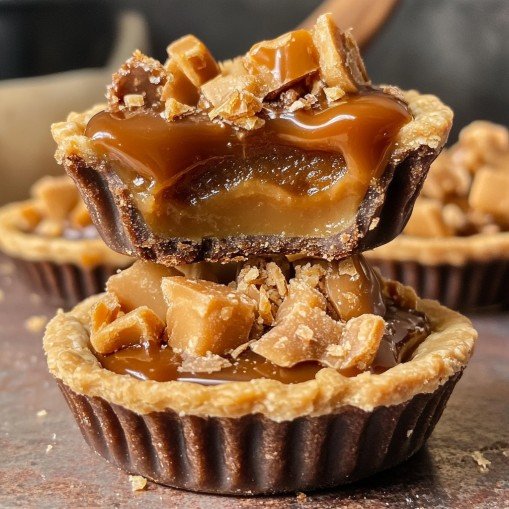
For that final touch, sprinkle a few more chopped Butterfinger pieces over the top of each mini pie. This adds more crunch and gives guests a preview of the deliciousness inside. Plus, the bright orange color of the candy contrasts beautifully with the dark chocolate and golden caramel.
4. Chill Before Serving
Once everything is topped off, it’s time to chill the pies in the refrigerator. Allow them to set for at least 1-2 hours, or even overnight, to give the flavors a chance to meld together. The caramel and chocolate will firm up, making the mini pies easier to serve without making a mess.
After chilling, the Butterfinger Caramel Crunch Mini Pies will be ready to be devoured. Their crunchy base, creamy topping, and sweet fillings will have everyone asking for seconds (or thirds!).
Part 5: Serving Suggestions and Variations
Now that your Butterfinger Caramel Crunch Mini Pies are chilling and ready to be served, let’s explore some creative ways to serve them and possible variations that could make this treat even more exciting!
1. Perfect Pairings: What to Serve with Your Mini Pies
While these mini pies are delightful on their own, pairing them with the right drink or side can elevate the experience. Here are a few ideas:
- Coffee: A rich, bold cup of coffee, whether hot or iced, pairs wonderfully with the sweet and crunchy flavors of these mini pies.
- Vanilla Ice Cream: For a decadent treat, serve these pies with a scoop of vanilla ice cream. The cold, creamy texture complements the crunch of the Butterfinger and the richness of the caramel.
- Milk: You can never go wrong with a classic. A glass of milk is a perfect, comforting choice to go alongside these pies.
2. Creative Serving Ideas
- Mini Dessert Platters: If you’re serving these mini pies at a party, consider creating a platter of different mini desserts. Pair them with mini cupcakes, brownie bites, or bite-sized cheesecake to give guests a variety of sweet options.
- Pie Shooters: Serve the Butterfinger Caramel Crunch Mini Pies in mini shot glasses or small mason jars for a fun and trendy presentation. This adds an element of surprise and allows your guests to dig in with a spoon!
3. Perfect for Holiday Gatherings
These mini pies are the perfect addition to any holiday spread. Whether it’s Thanksgiving, Christmas, or a Halloween celebration, they’re festive, delicious, and sure to stand out on the dessert table. To match a holiday theme, you can even add seasonal touches to the toppings. For example, use red and green sprinkles for Christmas or orange candy for Halloween.
 Part 6: Tips and Tricks for Success
 Part 6: Tips and Tricks for Success
To ensure your Butterfinger Caramel Crunch Mini Pies turn out perfect every time, here are a few handy tips and tricks to keep in mind:
1. Choose the Right Pie Crust
The pie crust can make or break your mini pies, so it’s essential to use a good quality crust. While store-bought options are convenient, you can opt for a homemade crust if you prefer. For a gluten-free version, try using gluten-free graham crackers for the crust base.
2. How to Avoid Soggy Crusts
If you want to keep your crust nice and crisp, be sure to pre-bake it slightly before adding the filling. This will prevent the crust from becoming soggy when you add the creamy topping and caramel. Just bake the crust for 5-7 minutes at 350°F before filling it.
3. Customize the Candy Mix-ins
Feel free to experiment with different candy pieces or other mix-ins to make this recipe your own. You could try adding chopped Reese’s cups, M&Ms, or even crushed Oreos to the filling for a fun twist. Just remember to stick with crunchy, textured candies that will complement the caramel and chocolate flavors.
4. Make It in Advance
If you’re preparing these pies for a party or gathering, consider making them ahead of time. They hold up well in the fridge and can be stored for 2-3 days. This makes them an excellent make-ahead dessert option for busy hosts or party planners.
Part 7: Frequently Asked Questions (FAQs)
As you prepare to dive into making these irresistible Butterfinger Caramel Crunch Mini Pies, you might have a few questions. Here’s a roundup of some frequently asked questions to guide you through the process and help ensure your pies turn out perfect!
1. Can I use a different candy instead of Butterfinger?
Absolutely! While Butterfinger bars provide a delicious crunch and peanut butter flavor, you can swap them out for other candies like Reese’s Peanut Butter Cups, Snickers, or even Crunch Bars if you prefer a different taste. Just be sure to use candies with a crunchy texture to mimic the Butterfinger effect!
2. Can I make these mini pies gluten-free?
Yes, you can easily make these mini pies gluten-free. To do so, simply substitute the regular pie crust with a gluten-free graham cracker crust or use gluten-free cookies for the base. Most candy bars like Butterfinger are already gluten-free, but always double-check the labels to be sure.
3. How long do the mini pies need to chill in the fridge?
For the best results, chill your mini pies for at least 2 hours before serving. This will help the filling set properly and ensure that the pies hold together when you cut into them. If you need to prepare them in advance, you can refrigerate them for up to 2-3 days.
4. Can I make these pies ahead of time?
Yes, Butterfinger Caramel Crunch Mini Pies are a fantastic make-ahead dessert. You can prepare them up to 2-3 days before serving. Just be sure to store them in an airtight container in the refrigerator. The caramel and Butterfinger bits may soften slightly, but they’ll still taste delicious!
5. What can I use instead of caramel if I don’t like it?
If you’re not a fan of caramel, you can substitute it with other fillings such as chocolate ganache, marshmallow fluff, or peanut butter. These alternatives still pair well with the Butterfinger and will give you a different but equally tasty flavor combination.
6. Can I freeze the mini pies for later use?
Yes, you can freeze these mini pies! After assembling the pies, place them in an airtight container or wrap them tightly in plastic wrap, then freeze. When you’re ready to serve, allow them to thaw in the refrigerator overnight. Freezing can alter the texture slightly, so it’s best to enjoy them within 1-2 weeks for the best results.
7. How do I store the leftover mini pies?
Leftover pies can be stored in an airtight container in the refrigerator for up to 3 days. For long-term storage, you can freeze them as mentioned above. Just make sure they are well-covered to prevent them from absorbing odors from other foods in the fridge.
Conclusion
These Butterfinger Caramel Crunch Mini Pies are a delicious, easy-to-make dessert that’s perfect for any occasion. Whether you’re serving them at a party or enjoying them at home, they are sure to impress with their sweet, crunchy, and creamy texture. With the right ingredients, a bit of patience for chilling, and some fun serving ideas, you’ll have a treat that everyone will rave about!
So, roll up your sleeves and start baking these mini pies today. Enjoy the perfect balance of chocolate, caramel, and Butterfinger crunch in every bite!
Print
Butterfinger Caramel Crunch Mini Pies: Easy & Delicious Dessert
Ingredients
Instructions
- Author: laura